Tuesday, 18 May 2010

Module 1 Chapter 8

This chapter is about creating more complex samples using bonding, hand and machine stitching and padding.

This first sample uses painted bondaweb and hand and machine stitching. I am really pleased with its delicacy.

1.8.1

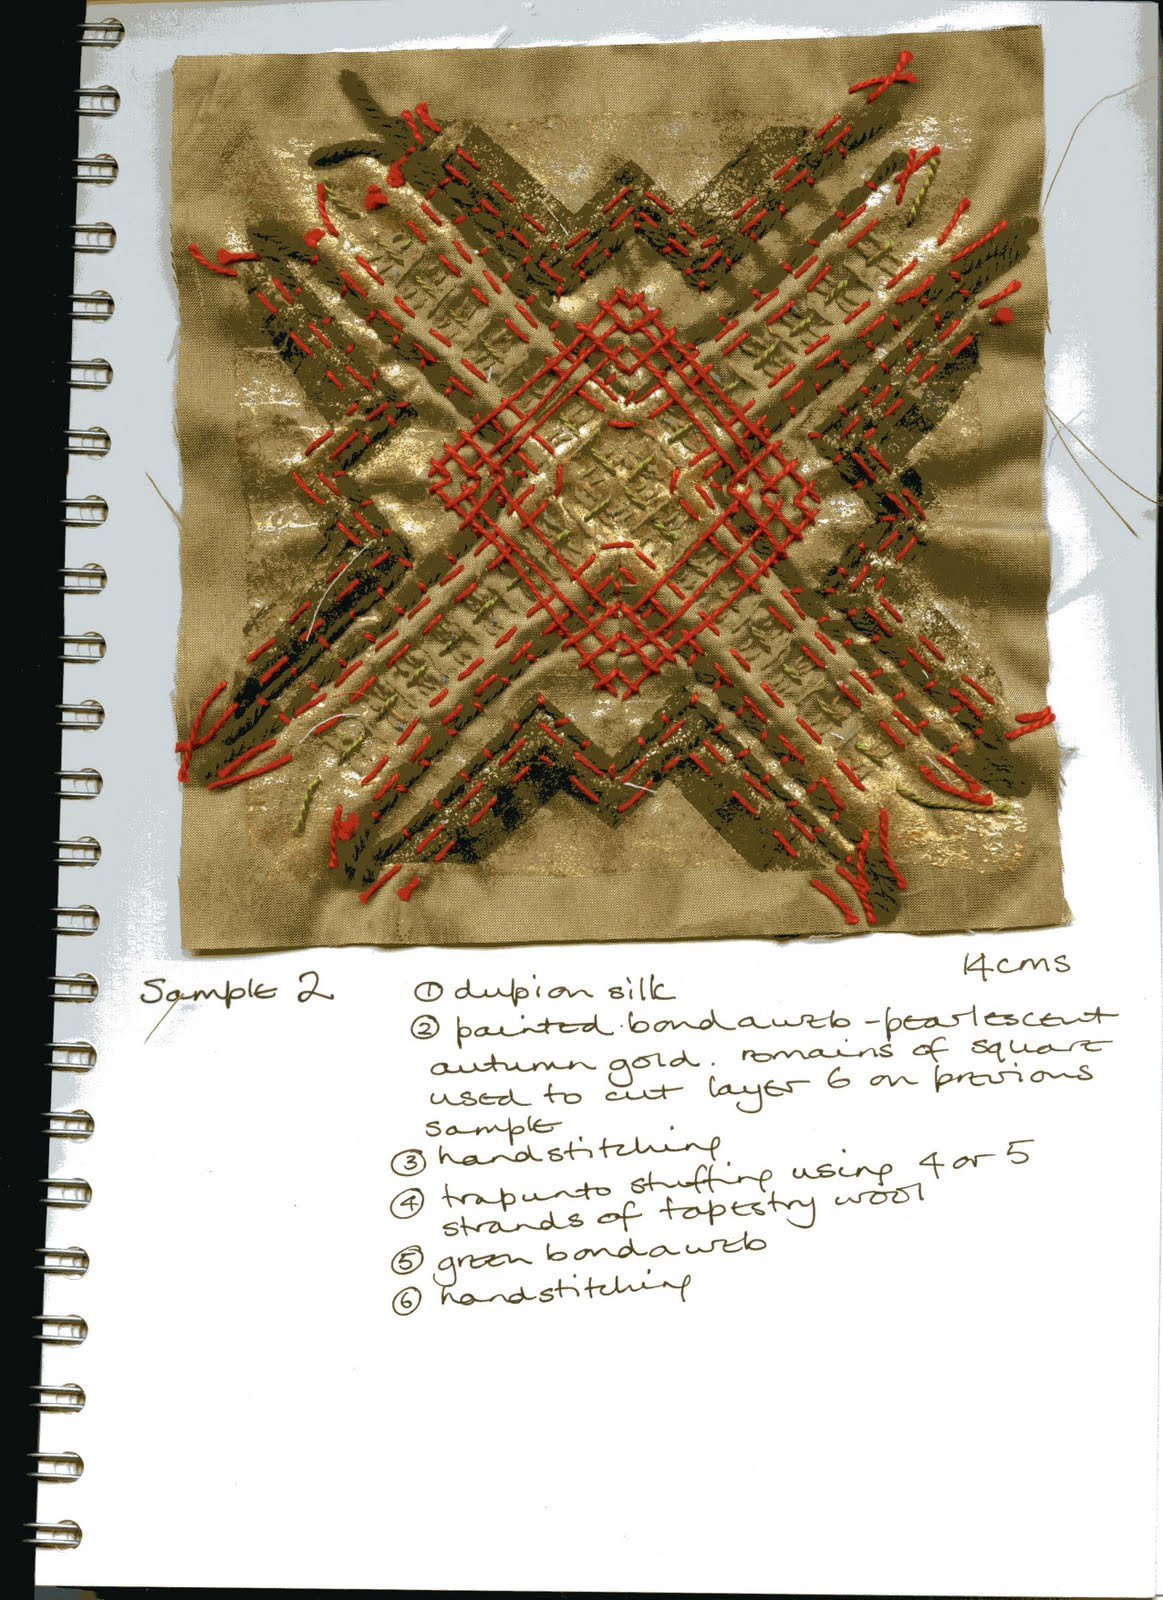
For this second sample, I started off with the square of painted bondaweb from which I had cut the shape I used in the first sample. Its quite heavily stitched and has been padded trapunto style from the back using tapestry wool.

1.8.2

This next sample doesn't contain any padding, although the organza has distorted from being torn into strips and has quite a three dimensional quality.

1.8.3

Sample 4: Once I scanned this in to my computer, I noticed the little dashes of tan colour between the green running stitches, which are much less noticeable in the sample itself.

1.8.4

I really enjoyed making sample 5. I am lucky enough to have been given an embellisher which I have never really got to grips, because I have never given it the time needed. I like the colours of this sample, and I like the way the cut shapes have distorted a bit as they have gone through the machine. I decided to let them. I am also pleased with the quilted effect the hand and machine stitching has created.

1.8.5

I also enjoyed making this last sample, which has got a bit flattened in the scanner - it is much more three dimensional than it appears.

1.8.6

Monday, 26 April 2010

Module 1 Chapter 7

Stitching at last - translating some of the layered designs into embroidery. All of these samples have scanned in well, except that the background colour in samples 2 and 5 are a bright lime green.

1.7.1
1.7.2
1.7.3
1.7.4
1.7.5
1.7.6

Friday, 9 April 2010

Module 1 Chapter 6

Bonding using bondaweb - first some samples of painting on bondaweb.

1.6.1

This is a series of bonded decorative fabrics.
The top left sample and the middle right sample are both made using the same red base fabric, covered with snipped pieces of the same fabrics, but with a different fabric laid on top. In the case of the top left sample, it is a gold organza, and the middle right, it is cream net.
The base of the top right sample is pale pink tissue paper. It is sprinkled with narrow strips of cellophane and snipped threads, and the top layer is a pale orange twinkle organza.
The middle left sample uses the pale orange twinkle organza as the base, is sprinkled with the same cellophane strips and snipped threads, and is topped with cream net.
The bottom 2 samples both use a lime green dress lining as the base. The left sample is sprinkled with various threads between 4cms and 8cms long, and is topped with the cream net. The right sample has painted bondaweb, long lengths of orange thread, and the top layer is the cream net.

1.6.2
Finally a series of samples interpreting some of the cut paper samples using bonding. At Sian's suggestion I have tried to create some asymmetrical designs, but I find it quite difficult. Sample 1 is a simple recreation of one of my cut paper designs. Samples 2 and 3 are symmetrical about one of the diagonal axes, but sample 4 is asymmetrical. I shall keep trying with the stitched samples in the next chapter!

1.6.3

1.6.4

Module 1 Chapter 5

On to fabric at last. Surprisingly, this collection of fabric all came from my stash. It is a variety of different sorts of fabric - plain cottons (bought from Ebay several months ago), silks (plain and slub), and various organzas. The fabrics in the green range, particularly those in the centre of the bottom row, have not photographed well - they have come out much bluer than they actually are.

1.5.1
The next task is to print on some of the fabrics, using the rubber print block made in an earlier chapter. At Sian's suggestion, I cut the block in half for some of the prints.

1.5.2

Sunday, 28 March 2010

Module 1 Chapter 4

Cut and fold design shapes in black paper.
As a child I used to spend hours cutting ever more intricate patterns in folded paper. I can't remember whether I used to fold the paper the same every time or I used to change the way I folded the paper.
This exercise requires that, using one of your stars as the design source, you make a series of cut paper designs. I chose 3 stars, and found this whole exercise really fascinating.
All these sheets are A3.

1.4.1
1.4.2
1.4.3
1.4.4
1.4.5

Then I had to produce a series of designs combining cut and fold shapes using 3 layers of the painted papers from Chapter 2. Once again these sheets are all A3.

1.4.6

1.4.7

Thursday, 25 March 2010

Module 1 Chapter 3

This chapter is about design development in a variety of ways from the source material. These working sheets are all A4 size.

W 1.3.1
W 1.3.2
W 1.3.3


W 1.3.4

W 1.3.5


Design Sheet A
This first sheet, which is A3 size, shows counterchange, positive and negative, and symmetrical and asymmetrical designs. They are all cut from the painted papers made as part of Chapter 2.

1.3.1

The next sheet, also A3, as are all the remaining sheets in the chapter, shows the distortion of a star into circle, triangle and diamond shapes. Then a series of repeat patterns using the star distorted into a triangle shape .

1.3.2

Design Sheet B
The first exercise is to combine a large and small version of the same star into a single design. I chose to combine a small star into a larger negative unit of the same star, and then make a repeat pattern and a border and corner design.

1.3.3

This next sheet is a series of linking borders. In the top design, the stars are woven together without being cut, whereas in the border to the left, I had to cut each star to make them interlink. The third design links two different shapes, a 4-pointed star and an 8-pointed star, asymmetrically, and then makes a repeat pattern.

1.3.4

New shape from old.
I scanned an individual cut design from a previous page into the computer, printed it out, and then cut a new star from it. I then used it to made a simple counterchange design. In the lower design I rotated each of the corner sections of the counterchange so that the corners were in the centre.

1.3.5

Design Sheet C
Complex counterchange using an 8-pointed star and a 5-pointed star. Interestingly, in both cases I only cut 1 star from 1 square of paper. Having made the counterchange with the 8-pointed star, I was able to repeat it with the bits I had left. With the 5-pointed star I was only able to make a mirror image. Not being a mathematician, I can only assume that this is because the 8-pointed star is symmetrical about both the vertical and horizontal axes, and I was able to rotate the pieces, whereas the 5-pointed star is only symmetrical about the vertical axis, and rotating the pieces would have resulted in a star on its side. I chose not to do that, and ended up with a mirror image.
Then I had to take a quarter of one of the complex counterchange designs and expand it. I then made a series of designs using all or part of the design.
1.3.6

1.3.7

Wednesday, 24 March 2010

Module 1 Chapter 2

Chapter 2 is about painting papers using inks and a sponge.

W 1.2.1

1.2.1

1.2.2
I then had to cut a print block from a rubber using part or all of
one of my stars as inspiration, and then print a selection of my printed papers.

1.2.3

Finally I had to select two of my papers, use one of them as a background and cut a series of stars from the other.

1.2.4