Monday 15 October 2012

Module 2 - loose ends

Each module requires costings, timings, an evaluation of the final piece, plus an awareness of relevant health and safety issues.

Timings

Introduction                       5.5 hours
Chapter 1                            7 hours
Chapter 2                            33.5 hours
Chapter 3                            14.5 hours
Chapter 4                            15 hours
Chapter 5                             9.5 hours
Chapter 6                             23.5 hours
Chapter 7                             21.25 hours
Chapter 8                             14.75 hours
Chapter 9                             12.5 hours
Chapter 10                           16 hours
Chapter 11                           39 hours
Chapter 12                           41.5 hours
Chapter 13                           6 hours

TOTAL                               254 hours

Costings

3 sketchbooks                    £27
paper                                    £5
art materials                         £5
dyes                                      £9.85
fabric                                    £16.29
lutrador                                £2.50
pelmet vilene                       £5.90
thread                                   £12

TOTAL                                 £73.64


Details of the embroidered assessment piece

Design work started:  22/04/2012
Time spent on design stage: 29.5 hours
Final item started: 26/09/2012
Final item finished : 9/10/2012
Time spent making final item: 12 hours

Materials used
half a metre of pelmet vilene       £2.95
fabric                                               £5
dye and paint                                 £2.50
thread                                              £1
lead weight for base                      20p

TOTAL                                            £11.65

EVALUATION OF FUNCTIONAL 3D EMBROIDERED ITEM

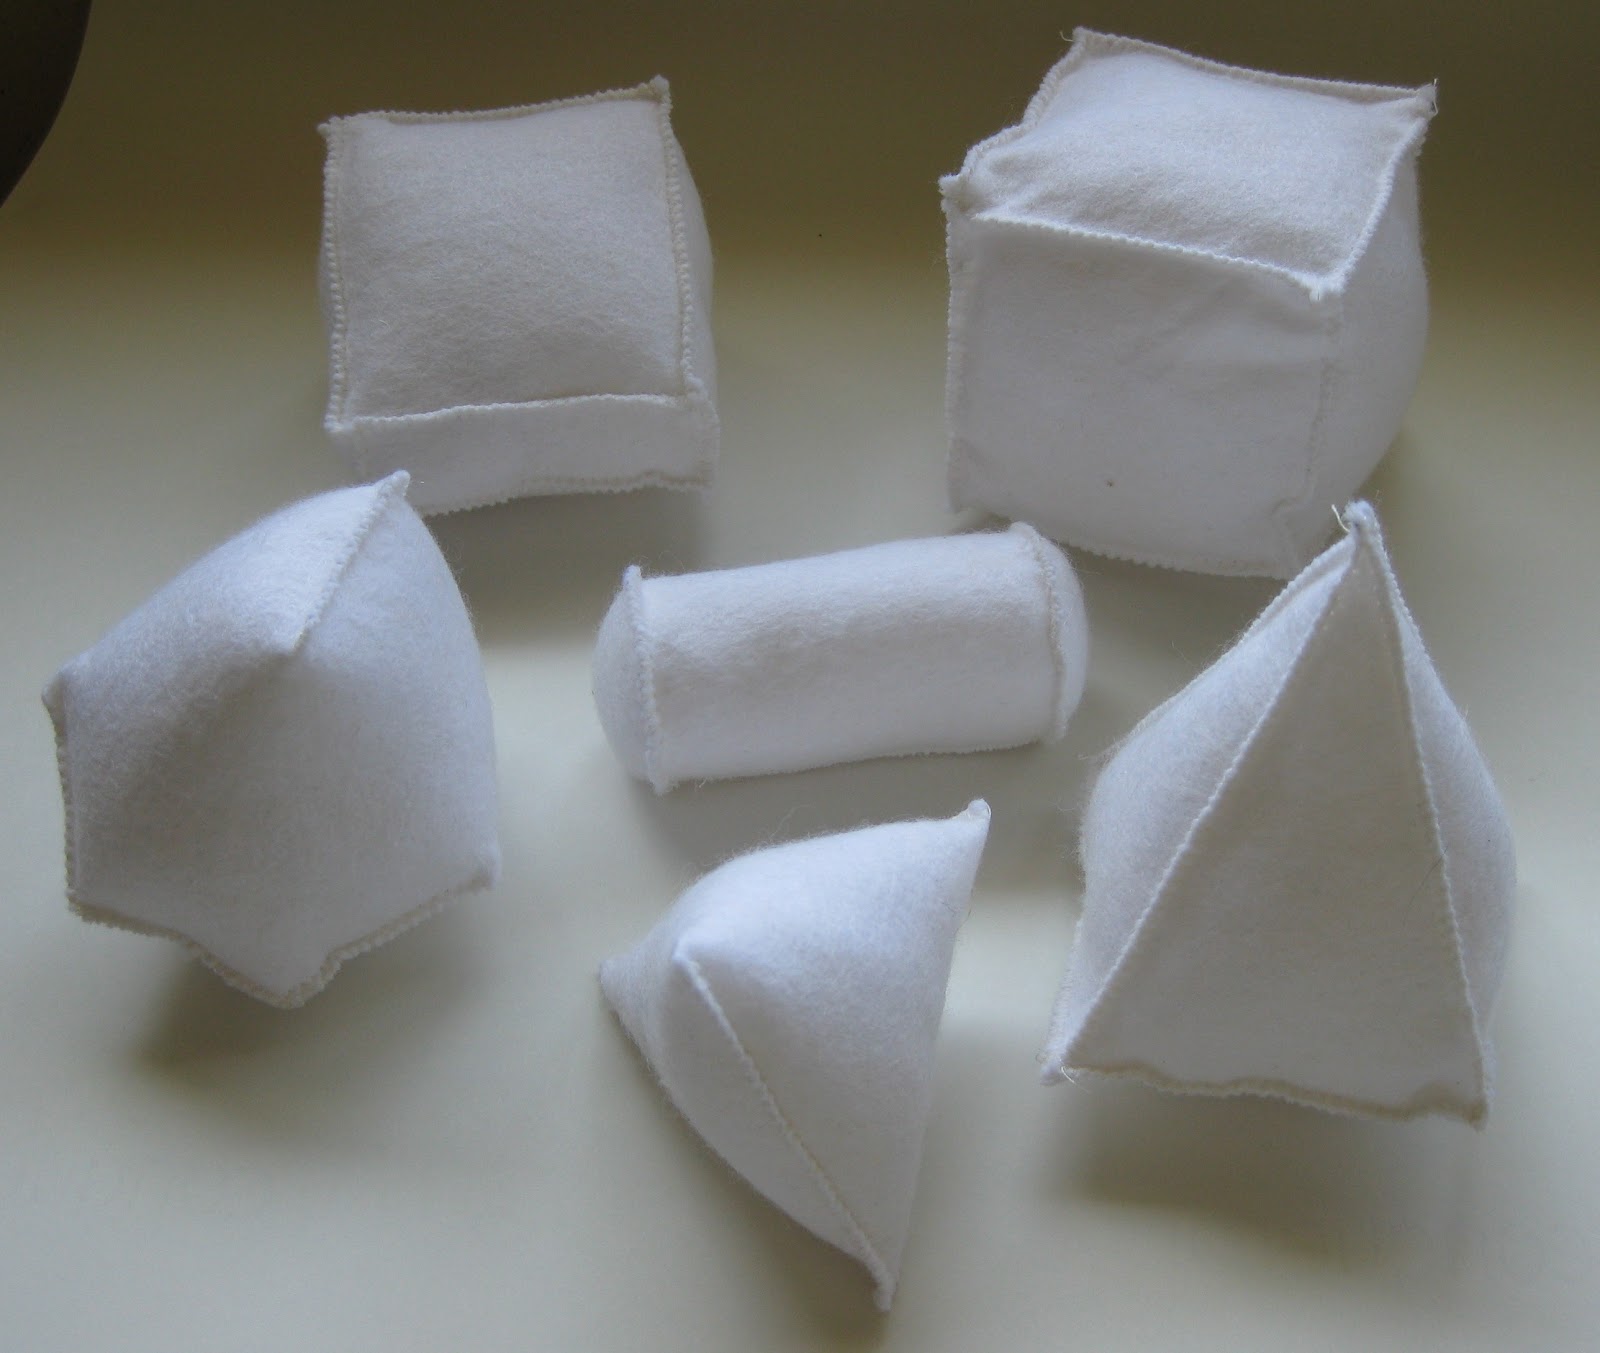
The completed embroidered assessment piece for Module 2 is a vessel based on the design topic of animal markings.

How do you feel about the resulting conclusion?
My aim was to make a sculptural vessel which could be used as a container for say pot pouri, although I would display it simply as a sculptural piece.
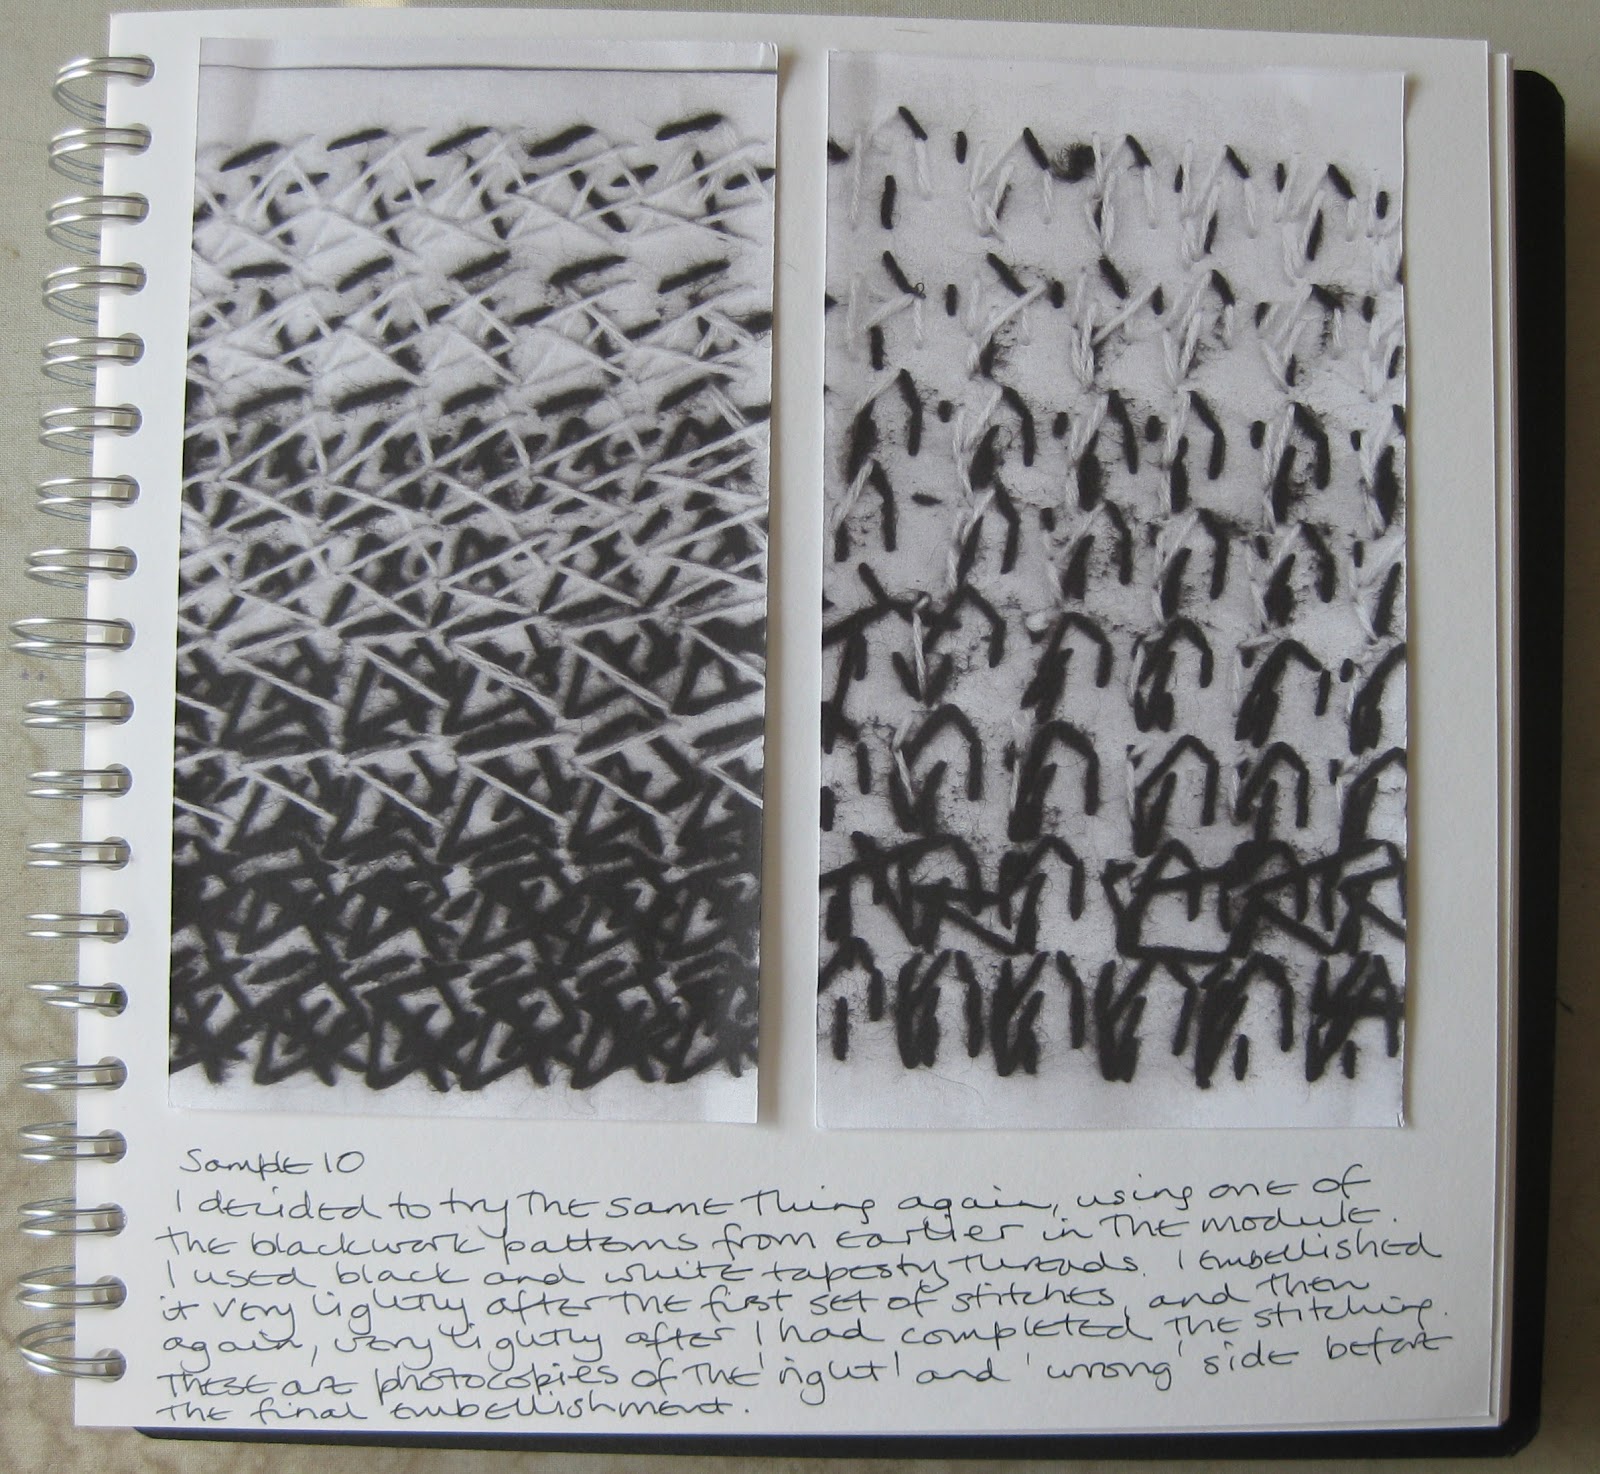
I was keen to find a way of making it out of one layer of fabric and chose pelmet vilene. I discovered that by attaching threads and strips of fabric to one side of the vilene using an embellisher, I created a shadow of the "front" on the "back" which I really liked. The embellisher also softened the vilene and made it more pliable, but care needs to be taken not to weaken the vilene.
It was an easy decision  to put the textured side inside the vessel rather than on the outside, because looking at the vessel, because of its shape, you tend to see more of the inside. 
Generally I am extremely pleased with the outcome. I particularly like the translucency when there is light behind it, which I had not expected. 

Is it fit for its purpose - give reasons?
I think it is a very beautiful shape and therefore very visual. Thanks to the lead curtain weight sewn between the two layers of the base it is very stable, and would therefore act as a container.

If you were asked to make it again, what changes would you make to the way you designed it and the way you made it?
There are three aspects I would look at if I were to make it again.
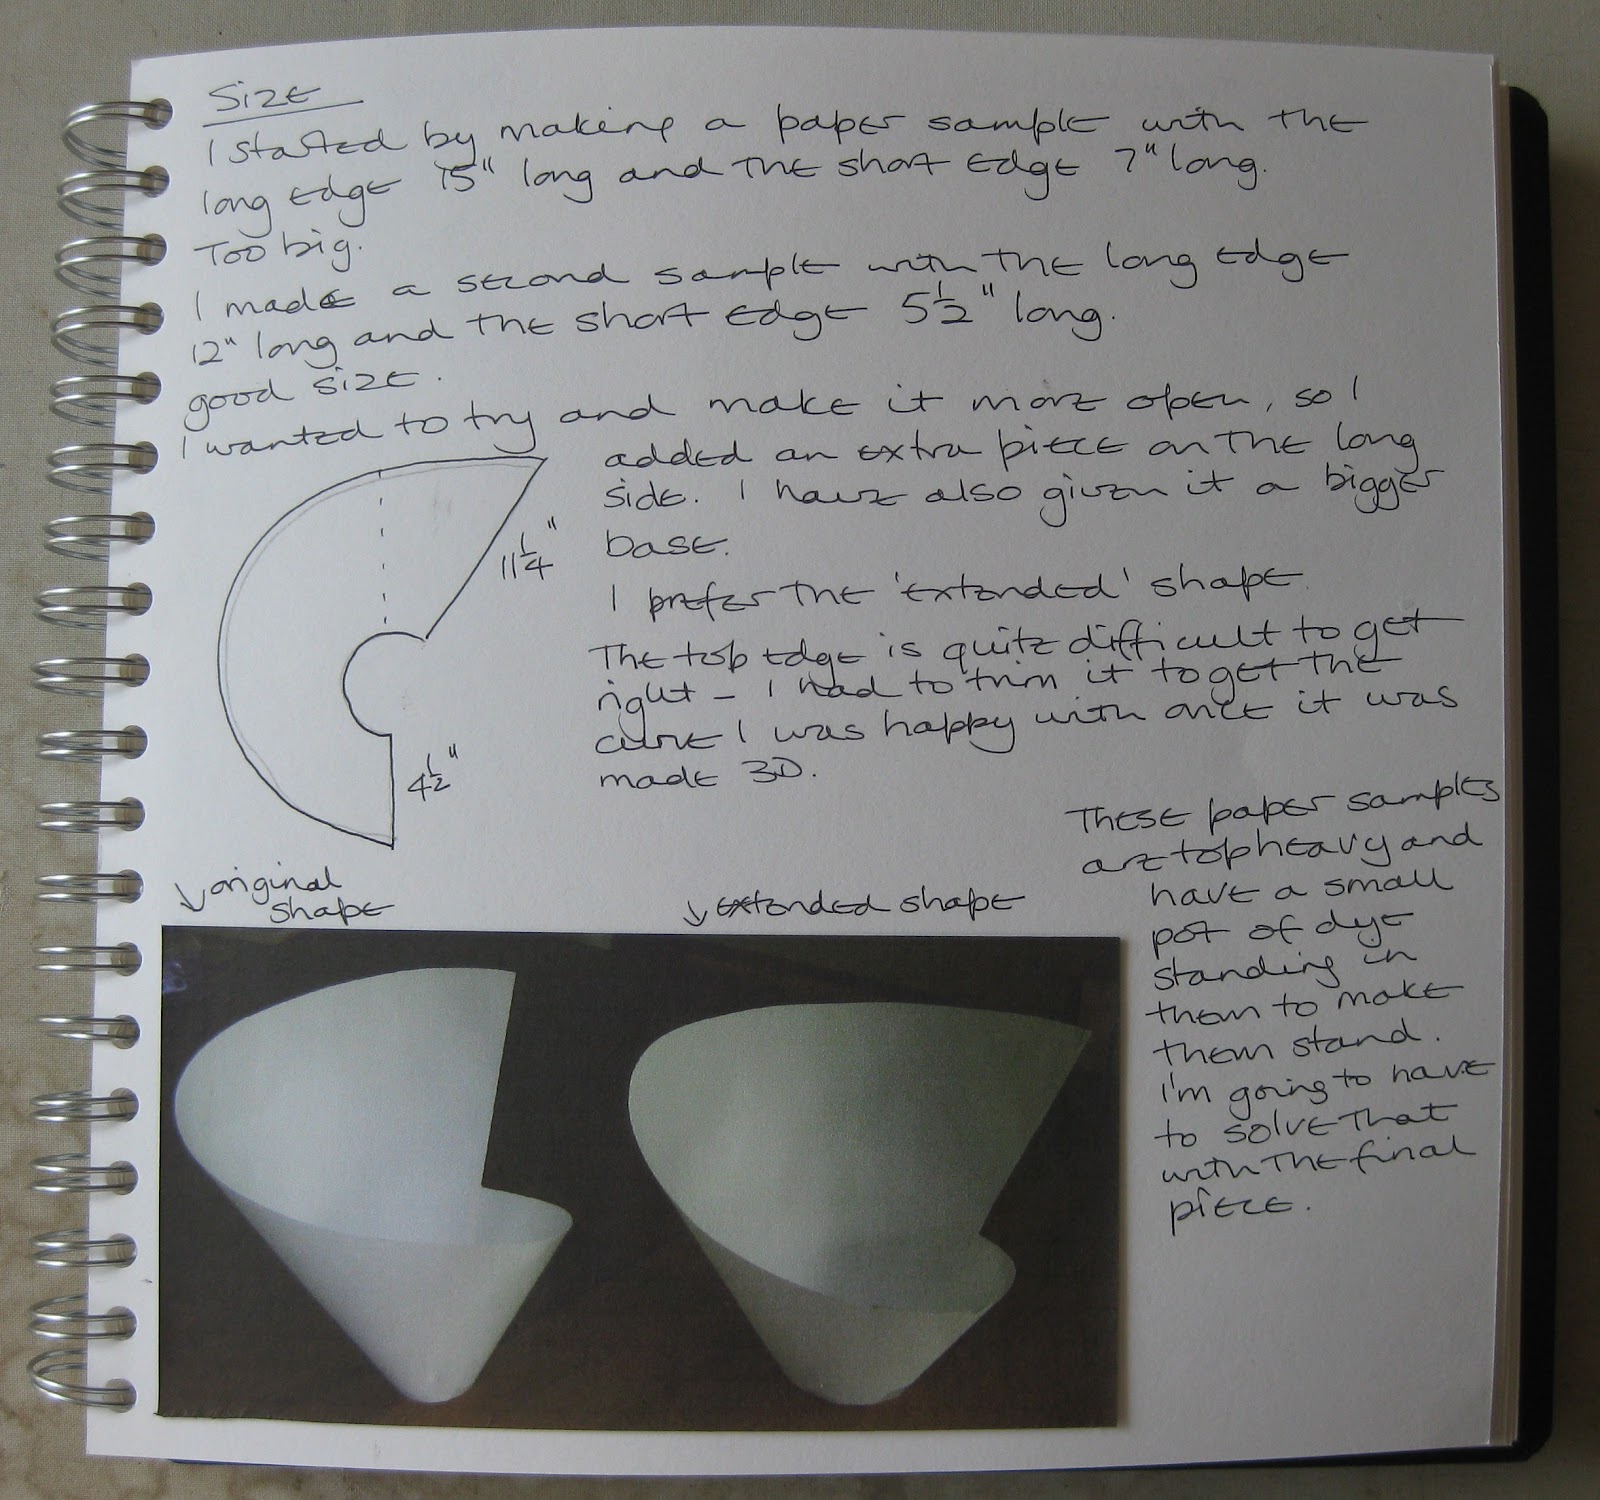
I would look at the curve of the top which is very important to the overall look of the piece, to see whether it could be further refined. In particular I would see whether the short edge at the join could be shorter, making a more dramatic line.
I would also look at the treatment of the edge, to see if I could find a way of making it more ethereal. I like the way the strips of fabric extend beyond the edge, but I don't like the solidity of the cut edge of the vilene. 
I would also see if there is a different fabric I could use as the base  fabric. It would need to be self supporting after it had been embellished, so it may be that the vilene is the best choice. 


Health & Safety

Sewing machine, embellisher

  • Keep machines clean and well oiled
  • Have a comfortable chair that is the correct height for comfortable working relative to the table the machine is on
  • Make sure that the leads are out of the way and not snaking around to be tripped on
  • Take regular breaks
  • Make sure that the light is good
Rotary cutter, Stanley knife, scalpel
  • Always use with a cutting mat and a safety ruler
  • Always make sure that the blade is retracted / locked when not in use
  • Never cut towards yourself but always away from yourself.
  • Keep you hands clear of the cutting edge

Dyeing

  • Always wear protective clothing and rubber gloves
  • Always wear a mask when working with powders and mixing dyes
  • Ensure that the utensils are dedicated to dyeing and not used for food preparation
  • Protect work surfaces from spillages
  • Ensure that unused dyes etc are kept in clearly marked containers and in a safe place out of the reach of children
  • If working indoors, make sure that the room is well ventilated
General working
  • Have a comfortable chair that is the correct height for comfortable working reyelative to the table
  • Take regular breaks
  • Make sure that the light is good
  • Keep your working area tidy and keep electric leads out of the way


Wednesday 10 October 2012

Module 2 - Chapter 13 Study three artists

HANS HOLBEIN THE ELDER AND YOUNGER

Hans Holbein the Elder (1460 – 1524) was born in Germany and worked initially in the late Gothic style. He was a pioneer and leader in transforming German art from the Gothic style to the Renaissance style.

His son, Hans Holbein the Younger (1497 – 1543), spent two spells in England, 1526 – 8 and 1532 – 40. He became painter to King Henry VIII in 1536. He made a number of beautiful portraits (drawings and paintings) of courtiers, which are a wonderful source of details and information about high status clothes of the period.

I had expected to find far more details of blackwork than I did, but below  are some examples.


The first example is of a shirt collar from a painting of  Thomas Howard, 3rd Duke of Norfolk, painted in 1539/40. The detail is beautiful, and it would be possible to recreate the design. Note the detail of the cord holding the collar of the shirt together.


The next two samples are details of cuffs taken from two portraits of Jane Seymour painted in 1536/7 and 1540. Once again it would be possible to recreate the designs. What is particularly interesting is that both the inside and the outside of the cuffs are visible in the paintings, and they are identical.


This final image is a detail from the Darmstadt Madonna, painted in 1528/9. It is beautiful, and as with the other examples, it would be possible to recreate the design.

HOLBEIN STITCH
Holbein stitch is the stitch used to create a design that looks the same on both sides, which would be necessary  on the cuffs in the Jane Seymour portraits. It is a double running stitch worked in both directions.

In “Mary Thomas’s Dictionary of Stitches” first published in 1934, it is described as follows:
“Holbein stitch consists of a simple running stitch worked in two journeys over the same line. In the diagram, the thread emerges at A and travels round the outline making running stitches and leaving spaces between, all of equal length. The small off shoots to the outline are also worked on this first journey. making them like a satin stitch. When the end of the line is reached at B, the needle turns back for its second journey, making an exactly similar running stitch.” 


BRIDGET RILEY

Bridget Riley was born in 1931, and trained at Goldsmiths College of Art and the Royal Academy of Art. Her early work was in a semi impressionistic style and she started developing her “op-art” style in the early 1960s. It is for this style that she became well known.

A representative selection of her work can be seen here – 40 images in chronological order. (Hover your mouse over each image for details.)

Looking at these pictures, it is very easy to see how her work developed –

·         starting with black and white images from the 1960s (eg Movement in Squares 1961)
·         the introduction of a third tone , gray, (eg Arrest 1 1965)
·         the gradual introduction of colour (eg Cataract 3 1967)
·         the paintings inspired by the colours of Ancient Egypt (eg Achean 1981)
·         the lozenge paintings (eg Nataraja 1993)
·         her more recent paintings with more fluid shapes, and fewer and softer colours (eg Two Blues 2003)

Now in her eighties, she is still working, and was one of 12 contemporary British artists to be commissioned to design  a poster for London 2012.

Because of the large scale and the need for precision, she has worked with assistants since the 1960s. She develops her ideas through a series of small scale studies, which are eventually scaled up.

In her early black and white works, she uses simple shapes or lines , repeats them and changes their rythms to give the illusion of movement, three dimensions and sometimes colour – making the eye and the brain do the work. It is said that some of her early paintings and the paintings of other op-artists  caused nausea and the feeling of seasickness in some viewers.

In Movement in Squares (1961) the illusion of movement and a deep fold are created by reducing the width of the squares and massing them together.

In Blaze Study (1962) and Blaze 1 (1962), she has created a series of zigzag lines radiating out from an offset centre, with each line changing direction where it intersects with a series of invisible offset circles. They both give a strong sense of movement as well as the impression of depth.

While researching, I came across a couple of things she had said about her work, which I  felt were appropriate to include:

“Rythm and repetition are at the root of movement. They create a situation within which the most simple basic forms start to become visually active. By massing them and repeating them, they become more fully present.”

“Colour as light, and colour as paint behave in quite different ways. It was artists such as Monet and Seurat who taught us to make paint behave as light does, by dividing up the colour on  the canvas, so that it works optically, only mixing in the actual process of seeing it when the painting starts to live.”

For me, op-art is  very technical and theoretical, but nonetheless very visual and beautiful, and I think there is a lot to be learnt for the textile artist in terms of her approach to shape, line and colour.   


PAULINE BURBIDGE
I have chosen Pauline Burbidge as the third artist to study for a number of reasons. I have admired her work ever since it first started becoming known to the public in the 1970s / 1980s; she has worked in black and white a lot; and I was fortunate enough to see her retrospective exhibition  at the Festival of Quilts at the NEC in August
.
Published to go with the exhibition is a catalogue “Pauline Burbidge Works between 1975 and 2012” Apart from two short introductory essays, Pauline has written the commentary herself, and it explains how and why she started making quilts and how and why her work has developed and changed over the years.

It is fascinating to discover that one of the influences on her early quilts, which  are geometric and often include a lot of black and white, was Bridget Riley.  Good examples are Maple Leaf Quilt (1975) and Mirrored Steps (1983), both of which are illustrated in the catalogue, but I can’t find any images on line.

In the mid eighties, she started to introduce collage techniques and piece in a freer way. A good example of this is The Pink Fish (1991). Initially she worked with templates, but gradually she started cutting the fabric shapes directly and bonding then in place. She made a number of large studio quilts, often in series, eg the Reflections series, and inspired by the countryside around her. A lovely example is Dancing Lines which, along with other studio quilts, can be seen on Pauline's website.

In 2005, after having made a number of studio quilts, she started to develop a series of what she describes as "a new designer/maker range of quilts that were quicker to make and therefore more commercial", which she called the Quiltline Collection.These are generally whole-cloth quilts, machine stitched using a Grace quilting frame,with colour applied afterwards with a sponge. 

Also during this period she developed a series of what she calls "Stitch Drawings" a selection of which can be seen on her website. These are quite small, maybe 30 or 40cms. She draws with her machine stitched lines, applying paint afterwards using nature as her inspiration. The heading at top of the pages of her website include some sketchbook drawings which I think must have been preparatory to this body of work.

She has now returned to making big studio quilts eg Lindisfarne Revisited, which was in the exhibition. She describes the making process in great detail in the book.

I love her work. I am fascinated how her work has developed over the years from heavy hard-edged piecing in quite hard colours to really beautiful, much more painterly and expressive pieces.


Tuesday 9 October 2012

Module 2 - Chapter 12. The final object.

In her comments about my last post, Sian gave me considerable food for thought and I began to doubt my critical faculties. So I tried to address the various points she made.

2.12.26

2.12.27

2.12.28

I couldn't make the join (using 2 strips of iron-on vilene to hold the edges together) for a couple of days as I didn't have any, but when I finally got some, it worked so well, and I was so pleased with how it was looking, I decided to press ahead and treat it as the finished item, and not as a prototype.
So here it is.

2.12.29

2.12.30

2.12.31

2.12.32

The pelmet vilene is quite translucent, and the fabric strips on the inside show through quite strongly. The outside is actually quite delicate, so for these remaining images, I moved the bowl to a different position so there was no light behind it.

2.12.33

2.12.34

And finally, two close-ups of firstly, the stitching on the outside of the bowl, and secondly, the inside.

2.12.35

2.12.36

Thursday 6 September 2012

Module 2 Chapter 12 Stage 2

Some further thoughts for resolving a couple of the outstanding issues - making the join and weighting the bottom.


Monday 3 September 2012

Module 2 Chapter 12 - Stage 2

Stage 2 of this chapter involves a series of exercises to produce the design and samples for the first assessment piece - a functional embroidered three dimensional object.
I have decided to make a bowl.

2.12.10

2.12.11

2.12.12

2.12.13

2.12.14

2.12.15

2.12.16
 2.12.17

2.12.18

2.12.19

2.12.20

2.12.21

2.12.22
2.12.23

2.12.24


Thursday 14 June 2012

Getting back into the swing of things

Module 2 Chapter 12 - beginnings.

I hadn't intended posting this start to Chapter 12 until I had completed Stage 2, but having just returned from a wonderful holiday in the Outer Hebrides, it seems like a good way of picking up my thought processes again.

This chapter results in the first of 5 assessment pieces, and the brief is to make a three dimensional functional embroidered item. Stage 1 is to make a number of 3D shapes:

2.12.1

2.12.2

2.12.3

These shapes were all made with white felt and lightly stuffed.

2.12.4

2.12.5

2.12.6

2.12.7

2.12.8

2.12.9

The next stage is to develop the shapes further, thinking about tones and patterns. At this stage I'm drawn to 3 shapes and want to develop them further. I want to work with the woven box shape in 2.12.5 , the circular shapes in 2.12.7 and the petal like shapes in 2.12.9

Friday 20 April 2012

Module 2 Chapter 11 - Second thoughts

I mentioned to Sian that I'd noted that a lot of the images in my last post were very linear, so following her very useful suggestions, I've done some further work. I've had to but a new printer recently, and it has a photocopier and how much easier it makes producing lots of ideas almost as quickly as you can dream them up!

I started with image 9, made some diagonal cuts, kept the pieces in the same order and then shifted the strips up and down.

2.11.27

This is the same image, once again cut diagonally, but this time I turned some of the strips round before shifting them up and down. Not as much difference as I had anticipated.

2.11.28

Once again I started with image 9 from the previous post. I made 2 photocopies, laid them face to face and made a series of cuts through both layers. I then took alternate strips from each photocopy and laid them together in order without turning any round. The second image below was made using the remaining strips, but this time I turned each alternate strip round.

2.11.29

2.11.30

For this image I started again with image 9 from the previous post and overlaid it with some diagonal strips cut from image 8 from the previous post.

2.11.31

I wanted to try and change the scale, so I scanned the above image into my computer and using PSP 10 I selected a small area and printed it out larger. Then I overlaid it with some diagonal strips cut from image 7 from the previous post. The second image below has some additional vertical strips.

2.11.32

2.11.33

The next development was to try some torn rather than cut strips, and I decided I needed to try and get as much contrast between the two layers. So I started with image 1 from the previous post and overlaid it with torn strips from image 7 from the previous post, and then repeated it with image 2 from the previous post which was the darkest image.

2.11.34

2.11.35


Sian also made some suggestions for further steps to two of the fabric samples. So starting with image 19 from the previous post, I made some photocopies to see what I might do before I cut the textile sample. Firstly I made some horizontal cuts and shifted the pieces. Fot the second paper piece, I made diagonal cuts and rearranged the pieces having turned some of them round.

2.11.36

2.11.37

I liked the second one best, so decided to make similar cuts in the textile sample. I started to piece them back together using forward facing seams, but decided that was going to give me yet another series of strong lines which was why was unhappy about the sample in the first place! So I butted up the edges and joined them together with a simple zigzag stitch.

2.11.38

Now to tackle textile sample 21 from the previous post. First I made some horizontal cuts and rearranged them, then I made some diagonal cuts and rearranged them, and finally I made some slanting horizontal cuts, and rearranged them. I liked the second one best, so used that principle on the textile sample. I stitched the pieces back together again by butting up the edges and stitching together using a whip stitch with cream in the bobbin and black on the top.

2.11.39

2.11.40

2.11.41

2.11.42