Inlay applique is a new technique for me - basically it involves cutting the same shape from two pieces of fabric, swapping them over and stitching them back in using an insertion stitch. Traditionally, a fabric that doesn't fray is used - eg felt, leather.
This series of samples are all made using felt.
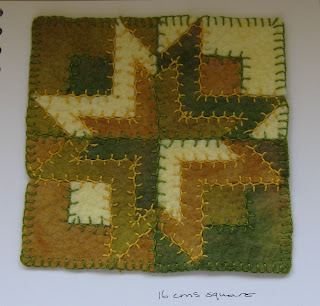
1.10.1

This is a series of insertion stitches. The background is various fabrics bonded onto felt, cut into strips, and rearranged. The strips were stitched to a piece of tissue paper to support them while the stitching was done.
1.10.2
 1.10.3
 The top pair of samples are made from hand painted papers, and the bottom pair from felt with painted bondaweb.I used a simple insertion stitch, added some running stitch to the backgrounds, and buttonhole stitch round the edges. I tacked the shapes onto brown paper to support them as I was stitching, and I found this easier to handle than tissue paper.
1.10.4

For this sample I used some beautiful hand dyed hand made felt which I had bought some time ago. Because the felt had such lovely texture, I decided not to to do any bonding or embellishment other than the buttonhole stitching round the edge. Once again I used brown paper as support.
1.10.5
 1.10.6
 For this final sample, I selected fabrics and shapes as detailed above. I wanted to use a different insertion stitch, and tried joining two bits of felt by machine, using the thread that was already in the machine - pale blue. I liked it and used it to join everything back together again. Finally, I added the running stitch.
I didn't think this sample was going to work, but I think the running stitch draws everything together and I really like it


