Further Design Exercises leading to fabric samples.
Because of other commitments, it's taken me a long time to complete this chapter. I've done it in fits and starts and it takes ages each time to pick up thought processes from where I stopped.
This first set of designs aims to show a series of different design elements.
2.11.1

2.11.2

2.11.3

2.11.4

2.11.5

2.11.6

2.11.7

2.11.8

2.11.9

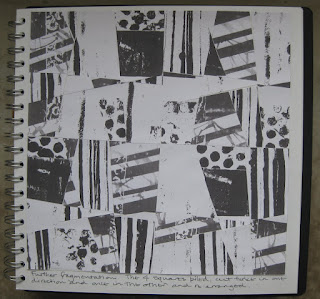
The next series are the "stack and whack" method. For this first series, I chose 4 different papers, some of which were photocopies of earlier designs, so they are fairly fragmented even before the first series of cuts.

2.11.7

2.11.8

2.11.9

The next series are the "stack and whack" method. For this first series, I chose 4 different papers, some of which were photocopies of earlier designs, so they are fairly fragmented even before the first series of cuts.
2.11.10

2.11.11

2.11.12

For this second series, once again I chose photocopies of earlier designs, and kept cutting and rearranging until the design was very fragmented.

2.11.11

2.11.12

For this second series, once again I chose photocopies of earlier designs, and kept cutting and rearranging until the design was very fragmented.
Stitched fabric samples based on the paper designs
Stage A.
Rather than slavishly try to copy the paper designs in fabric, I tried to follow the techniques I had used, and spent quite a bit of time putting machine embroidery onto the fabrics. I used both my own printed and dyed fabrics as well as purchased fabrics.
2.11.18

2.11.19

2.11.20

2.11.21

For this final series of samples, I used the "stack and whack" techniques, starting with these 4 fabrics, all of which I embroidered quite heavily. I intended to photograph the results after each series of cuts, but got so engrossed in the process that I forgot after the first series of cuts!

2.11.19

2.11.20

2.11.21

For this final series of samples, I used the "stack and whack" techniques, starting with these 4 fabrics, all of which I embroidered quite heavily. I intended to photograph the results after each series of cuts, but got so engrossed in the process that I forgot after the first series of cuts!
2.11.22

2.11.23

These are the final pieces, photographed on both sides. Each piece is about 23cms x 17cms and I have deliberately kept them separate. I like them so much I am thinking about finding a way of hanging them in a vertical group.

2.11.23

These are the final pieces, photographed on both sides. Each piece is about 23cms x 17cms and I have deliberately kept them separate. I like them so much I am thinking about finding a way of hanging them in a vertical group.
The final task in this module was to replicate the technique used for the final sample in the previous chapter, only this time to use patterned and decorated fabrics.
I started with 2 strips both of which were about 10cms wide x 45cms long. I constructed one strip from 2 light fabrics embroidered with white and the other strip from 2 darker fabrics embroidered with black. Both can be seen in the top section of the sample. I put one more cut than suggested in the second section, and made several cuts in the final section. I took a wire brush to the final section just to create a bit more texture.


Super samples Sheila! It's giving me inspiration to push on with my (hated) piecing in the hope that I can achieve something half as good as yours! Well done! (This is a hard and tedious module isn't it?)
ReplyDeleteHi Catherine - thanks for your lovely comments. I'm really enjoying this module. It's giving me lots of ideas for other things and I'm loving working in black and white. But it will be nice to get back to colour!!
DeleteLooking really good to me - I enjoyed this module more than I ever thought I would. Lovely patterns.
ReplyDelete