Thursday, 16 September 2010

Chapter 9 second attempts

In her tutorial for Chapter 9, Sian suggested that I should work the two
reverse applique samples using an identical stack of fabrics to see how different they turn out.

Both these samples (about 12cms square) are made with an identical stack, with the green silk on the bottom, then orange cotton, dark brown cotton printed with green, cream cotton and finally terracotta cotton on the top. In the left sample, the first stitching line is the outside line with the fabric cut away inside the line, and in the right sample, the first stitching line is the inside line with the fabric cut away outside the line.

1.9.8
They certainly are very different!

Sian also suggested various ways to improve the chenille sample, and I have made three samples. For the first time ever, I have produced some chenille samples that I am happy with!

This first sample is a pile ( about 10 layers) of different fabrics, including net, dress brocade, organza and an orange vegetable bag. In the top right half of the sample, the stitching lines are about half a centimetre apart, and in the bottom half the stitching lines are a good centimetre apart. I am really pleased by the amount of fray, particularly the orange vegetable bag, and the amount of the underneath fabric that shows.

1.9.5

This second sample is made from a series of offcuts laid randomly over the base fabric. I tried to keep a similar thickness throughout. On the top of the scraps, I laid 5 pieces of fabric, including net and dress brocade, with an organza on the top. All the stitching lines are a centimetre and a half apart. I am pleased with the amount of fray, although more distressing would make it better!

1.9.6

This final sample has about 8 layers, including space dyed cheesecloth, net, a gold fabric and organza. The machine lines are 2 cms apart. In the bottom left side of the sample, I have made the slashes equidistant from the stitching lines, and in the top right side of the sample, I have made the slashes closer to one stitched line than the other, alternately, so I get left with a wide strip and a narrow strip. This sample has frayed beautifully, particularly the gold. I love the way the wide strips stand up beautifully in comparison to the narrow strips, which are tucked down in between.

1.9.7

I think the edges of all three samples are really interesting, some of the layers are different sizes from the rest, and I find the resulting colour changes really interesting. All three samples are about 28cms x 20cms.

Thursday, 19 August 2010

Chapter 10 - Inlay applique

Inlay applique is a new technique for me - basically it involves cutting the same shape from two pieces of fabric, swapping them over and stitching them back in using an insertion stitch. Traditionally, a fabric that doesn't fray is used - eg felt, leather.

This series of samples are all made using felt.

1.10.1

This is a series of insertion stitches. The background is various fabrics bonded onto felt, cut into strips, and rearranged. The strips were stitched to a piece of tissue paper to support them while the stitching was done.

1.10.2
1.10.3
The top pair of samples are made from hand painted papers, and the bottom pair from felt with painted bondaweb.I used a simple insertion stitch, added some running stitch to the backgrounds, and buttonhole stitch round the edges. I tacked the shapes onto brown paper to support them as I was stitching, and I found this easier to handle than tissue paper.

1.10.4

For this sample I used some beautiful hand dyed hand made felt which I had bought some time ago. Because the felt had such lovely texture, I decided not to to do any bonding or embellishment other than the buttonhole stitching round the edge. Once again I used brown paper as support.

1.10.5
1.10.6
For this final sample, I selected fabrics and shapes as detailed above. I wanted to use a different insertion stitch, and tried joining two bits of felt by machine, using the thread that was already in the machine - pale blue. I liked it and used it to join everything back together again. Finally, I added the running stitch.

I didn't think this sample was going to work, but I think the running stitch draws everything together and I really like it


Chapter 9 - Reverse Applique

The summer (what summer?) is not a good time for getting on with C&G work, but I am concentrating again, and getting on with it.

This chapter is about reverse applique using both traditional and contemporary methods.

Firstly, the traditional method, which is based on Mola Work, produced by the native people of the San Blas Islands.

1.9.1

The drawing at the top is the design I used for these first samples - a simple cross with echo lines round it. I found this technique quite demanding, and didn't make it any easier for myself by choosing a shot silk for the top layer. Apart from being very beautiful, San Blas molas are immensely detailed and one can only admire the skill of the women who made them.

1.9.2

These two samples are made using a contemporary method. In both samples I used 5 layers of fabric. In the left hand sample, I machine stitched the inner line first (from the back), then cut away the top layer of fabric close to the outside of the machine stitched line, then repeated with the remaining three layers. In the right hand sample, I did the reverse, machining the outside line first and cutting away the top layer of fabric inside the line, and then repeated with the three remaining layers of fabric.

1.9.3

Chenille or slashed reverse applique - I have used 8 layers of fabric to create this sample. Starting from the bottom layer they are:
  1. cream curtain lining with the design drawn on it - I added more echo lines.
  2. dark green cotton
  3. lime green dress lining
  4. terracotta cotton
  5. apricot crystal organza
  6. pale apricot shot silk
  7. light green cotton
  8. green/cerise shot silk
I left the dark green layer uncut. The only layer which has had an impact on the finished sample is the sixth layer - the pale apricot shot silk, which has frayed and poked through the cuts.

1.9.5

The final sample in this module is the multi-coloured ripple effect sample. I layered up a variety of fabrics, most of which don't extend over the whole area of the sample, ending with a dark red organza which does cover the whole area. I started by machining the outside line and cutting away the organza inside the line. Then I built the pattern up in a much more random way machining lines and cutting away, sometimes inside the line, sometimes outside. I am really pleased with the end result.

Tuesday, 18 May 2010

Module 1 Chapter 8

This chapter is about creating more complex samples using bonding, hand and machine stitching and padding.

This first sample uses painted bondaweb and hand and machine stitching. I am really pleased with its delicacy.

1.8.1

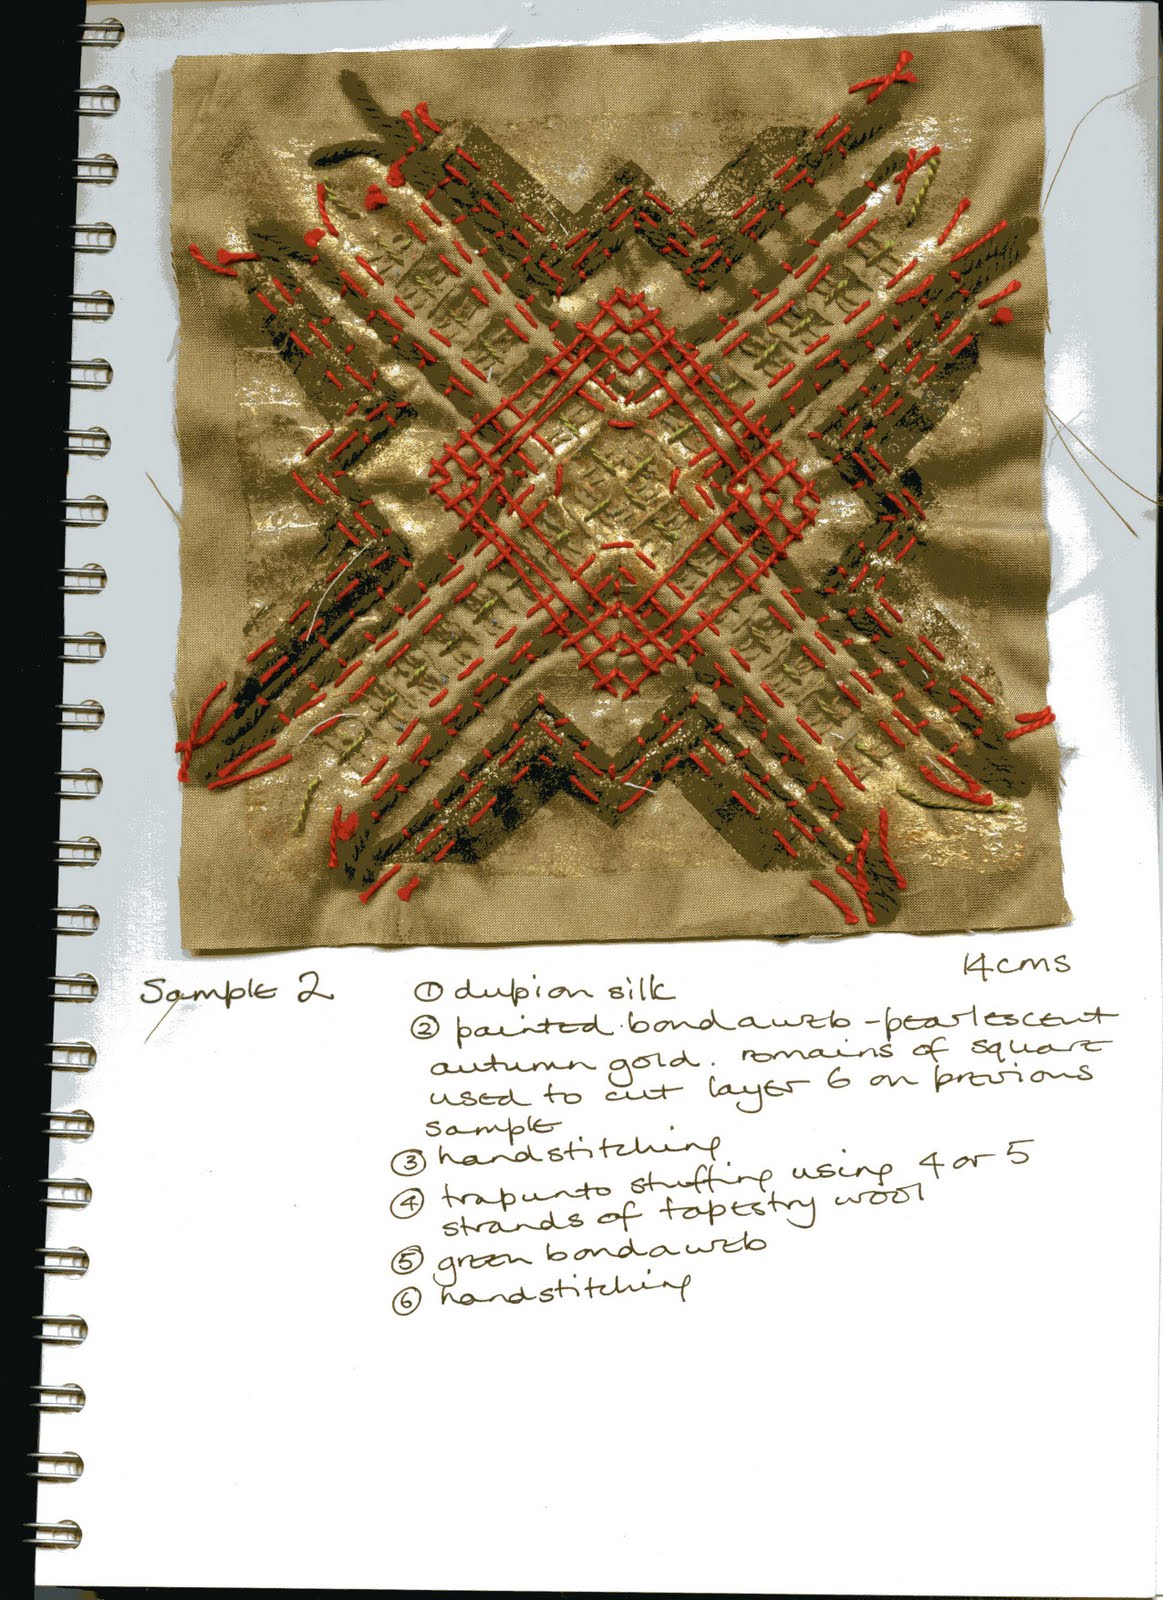
For this second sample, I started off with the square of painted bondaweb from which I had cut the shape I used in the first sample. Its quite heavily stitched and has been padded trapunto style from the back using tapestry wool.

1.8.2

This next sample doesn't contain any padding, although the organza has distorted from being torn into strips and has quite a three dimensional quality.

1.8.3

Sample 4: Once I scanned this in to my computer, I noticed the little dashes of tan colour between the green running stitches, which are much less noticeable in the sample itself.

1.8.4

I really enjoyed making sample 5. I am lucky enough to have been given an embellisher which I have never really got to grips, because I have never given it the time needed. I like the colours of this sample, and I like the way the cut shapes have distorted a bit as they have gone through the machine. I decided to let them. I am also pleased with the quilted effect the hand and machine stitching has created.

1.8.5

I also enjoyed making this last sample, which has got a bit flattened in the scanner - it is much more three dimensional than it appears.

1.8.6

Monday, 26 April 2010

Module 1 Chapter 7

Stitching at last - translating some of the layered designs into embroidery. All of these samples have scanned in well, except that the background colour in samples 2 and 5 are a bright lime green.

1.7.1
1.7.2
1.7.3
1.7.4
1.7.5
1.7.6

Friday, 9 April 2010

Module 1 Chapter 6

Bonding using bondaweb - first some samples of painting on bondaweb.

1.6.1

This is a series of bonded decorative fabrics.
The top left sample and the middle right sample are both made using the same red base fabric, covered with snipped pieces of the same fabrics, but with a different fabric laid on top. In the case of the top left sample, it is a gold organza, and the middle right, it is cream net.
The base of the top right sample is pale pink tissue paper. It is sprinkled with narrow strips of cellophane and snipped threads, and the top layer is a pale orange twinkle organza.
The middle left sample uses the pale orange twinkle organza as the base, is sprinkled with the same cellophane strips and snipped threads, and is topped with cream net.
The bottom 2 samples both use a lime green dress lining as the base. The left sample is sprinkled with various threads between 4cms and 8cms long, and is topped with the cream net. The right sample has painted bondaweb, long lengths of orange thread, and the top layer is the cream net.

1.6.2
Finally a series of samples interpreting some of the cut paper samples using bonding. At Sian's suggestion I have tried to create some asymmetrical designs, but I find it quite difficult. Sample 1 is a simple recreation of one of my cut paper designs. Samples 2 and 3 are symmetrical about one of the diagonal axes, but sample 4 is asymmetrical. I shall keep trying with the stitched samples in the next chapter!

1.6.3

1.6.4

Module 1 Chapter 5

On to fabric at last. Surprisingly, this collection of fabric all came from my stash. It is a variety of different sorts of fabric - plain cottons (bought from Ebay several months ago), silks (plain and slub), and various organzas. The fabrics in the green range, particularly those in the centre of the bottom row, have not photographed well - they have come out much bluer than they actually are.

1.5.1
The next task is to print on some of the fabrics, using the rubber print block made in an earlier chapter. At Sian's suggestion, I cut the block in half for some of the prints.

1.5.2